Showing posts with label bread. Show all posts

Monday, March 14, 2011

Irish Soda Bread

 
If you know me personally, you know that I'm pretty proud of my Irish heritage.  I love all things green, my birthstone is emerald, I even have three Irish themed tattoos.  I also believe no meal is complete without potato.  My favorite part of being Irish has always been listening to stories from my grandparents.  The Irish are gifted story tellers.  My grandfather was known to break into an Irish brogue mid story, even if he wasn't talking about Ireland.  My grandmother, or Nana as we call her, is first generation American.  Her mother (from Cork) and her father (from Galway) came to the US separately when they were teenagers.  My Nana is an out of this world cook and baker.  She says a good Irish woman doesn't need recipes, that they just know how to make everything delicious.  One day she taught me how to make Irish soda bread.  I was never allowed to look at the recipe, but after each ingredient was added she quizzed me on the recipe so far.  To this day, years later, I still have that recipe memorized (though I will sometimes cheat and look at the recipe my mom wrote down, just to be safe). 

So now I will let you in on the Dolan/Simpson/Rowan family secret recipe! 

<3 Sweet Cheeks

YOU WILL NEED:

 
2 c. flour
1/2 c. sugar
2 tsp. baking powder
1/2 tsp. salt
2 tbs. caraway seeds (optional)
1/2 cup raisins (optional)
1 large egg
1/2 tsp. baking soda
~1 c. milk
iron frying pan

PREPARATIONS:

1. Preheat over to 350 degrees.

2. To really plump your raisins: Measure 1/2 cup raisins in a 1 cup measuring cup.  Pour boiling water into the cup until the raisins are completely covered.  Let sit for at least 5 minutes, then drain water.  Set the raisins aside.

3. In a large mixing bowl, sift together flour, sugar, baking powder and salt.  I don't have a sifter, so I whisked them together. If you choose to use caraway seeds, you can mix them in now.  The seeds make it taste more like rye bread, whereas without the seeds it tastes more like a dessert cake.  I chose not to use the seeds.  This is also where you can add your raisins. 


4. Mix egg and baking soda in a large measuring cup.  Pour milk into the cup until the 1 cup line.  Whisk this mixture together. 


5. Make a hole in the middle of the flour mixture.  Pour the milk mixture into the hole and mix together until all the flour is wet.


6.. If you have a well seasoned iron frying pan, you can pour the mixture straight into the pan.  If your pan isn't seasoned, you'll need to grease the pan with butter or oil. 


7. Bake for 50 minutes or until knife comes out clean. (This changes for me every time, so I check often after the 30 minute mark.  This time mine was done at 40 minutes.) 


 8. Enjoy warm with butter! 

Tuesday, March 8, 2011

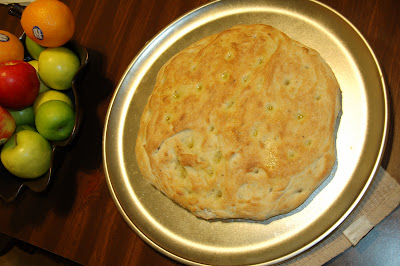
Focaccia Bread


When I graduated college, I moved in with my family while I was looking for a job. I got a job working on an overnight shift and quickly became nocturnal (read: I slept 10 hours a day and worked another 10). Being a broke college graduate with monumental student loans to pay back you sort of take whatever comes along first. My youngest brother and sister began referring to me as The Dragon because they knew that if they were too loud I’d come out of my cave (and it was a cave for it was always dark due to the blackout curtains and blanket I added for the extra measure) and growl in what probably would have passed as one of the beasts of legend. What can I say; I get grumpy when I’m hungry or tired. Catch me on a day when I’m both and I’m pretty sure you’d rather take on my mythical counterpart instead. On the rare days when I didn’t have to work and I was conscious at the same time as the rest of the family, I thought it would be fun to teach my brother, then 12, how to make bread by hand.

Not a lot of people think to make homemade bread from scratch but my family loves a good hunk of fresh bread on occasion. Store bought is fine but nothing beats a warm loaf right out of the oven. You can use a bread maker and set it up to be ready just in time for dinner, and I have nothing against bread makers it’s the bread maker that has a problem with me. I cannot, for the life of me, make bread in a machine that doesn’t turn into anything other than a condensed, hard-as-a-rock, piece of something. My mom has watched me do it multiple times, making sure my ingredients are correct and everything is done the way it should be: The darn thing just won’t work for me. This could have something to do with my technology curse. Anything electronic starts acting weird around me and, given enough time, I can break it beyond repair just by staring at it. Some of my friends don’t let me touch their electronics period. Regardless of my curse, the truth of the matter is I’m probably the only person on the planet that can only make bread the old fashioned way. So I set out to teach my littlest brother how to as well.

For Christmas he had gotten me a Betty Crocker Breast Cancer cookbook and we flipped through to the bread section to find something yummy. We settled on Focaccia and set to work gathering all the ingredients. Since the bread needs a sponge, it has to be started the night before. So we set out the flour, water and yeast and let it do its thing. The next night we added the rest of the ingredients and started kneading it all together. My brother took to it like a pro and was kneading the bread as if he had been doing it for years. After he was finished, we set the dough aside in a covered bowl and I tell him now we wait for it to rise. He looked at me and asked me what I meant. I explained to him that the yeast is a living organism and as it digests some of the ingredients; it gives off gases that makes the bread rise and expand. He cocked his head to the side considering this and then looked me square in the eye, “so it’s farting bread?” Leave it up to a kid to break something down to its simplest form. “Yes, it is farting bread.”

And so I give you a very delicious farting bread!

Babycakes

The last time I decided to make this bread, I wanted to try adding herbs and give it some flavor. I had no idea what type of spices to use so I asked my friends and one told me about the Simon & Garfunkel album Parsley, Sage, Rosemary and Thyme. He said he figured those spices went together well so we raided my spice cabinet. I had parsley, rosemary and thyme and added ½ tsp of each to the dough. It turned out very good!

*When preparing warm water for activating yeast, make sure the water is between 105۫ and 115۫F. Use a thermometer because if it’s not warm enough, it won’t activate and if it’s too hot it will kill the yeast

4 to 4 ½ cups all-purpose flour
½ cup warm water (105۫ to 115۫F)
1 tsp. Yeast
1 cup warm water (105۫ to 115۫F)
2 tsp. salt
1 Tbs. olive oil
Coarse Salt
Spices (fresh or dried)

To make the sponge (bread starter), combine ½ cup of flour with ½ cup of warm water and the yeast in a wooden bowl (wood works best and doesn’t leave the bread with a metallic taste). Mix together with a wooden spoon. Cover loosely with plastic wrap and store overnight at room temperature so it can ferment.

 
Gradually stir in 1 cup of warm water, 2 tsp. of salt, the spices and some of the flour. You want to add just enough flour so the dough begins to pull away from the sides. Lightly flour the surface of a counter and turn out the dough onto it. Knead enough of the remaining flour to create a stiff dough that is strong and smooth. This can take roughly 8-10 min. Grease a wooden bowl with butter or shortening and place the dough in it. Turn the dough to lightly coat with grease. Cover with a towel and let rise for about an hour until it has doubled in size.

 
Preheat oven to 475۫. Flour a baking sheet and place dough on top. Cover dough with the bowl and let rest for 30 min. Shape dough into a circle roughly 11 inches in diameter by pulling and pressing on it gently. Make sure you are careful not to disrupt any air bubbles in the dough.
 
Poke dough gently with your fingertips to create indents every 2 inches over the surface of the dough. Use a basting brush to spread olive oil over the top of the bread (or you can drizzle it on and use a paper towel to gently spread it around). Sprinkle with coarse salt and either leave bread on the baking pan or carefully slide onto a bread stone.

 
Bake for 15 to 20 minutes until the bread is light brown. Check bread after 8 min and pop any large bubbles that may have formed with a knife. Remove bread from the stone or baking sheet and cool on a wire rack for 15 minutes. Serve warm.

A Great Bread Dipping Sauce:

Oregano
Granulated Garlic
Dried Red Pepper
Salt
Pepper
Parmesan Cheese
Olive Oil

Mix equal parts oregano, garlic, red pepper, salt and pepper into a small, shallow dish. Add 1 Tbs. Parmesan cheese and stir together. Top with 2 Tbs. of olive oil and stir. Enjoy!

Wednesday, January 26, 2011

Banana Bread


When life is getting you down or the weather has been a little too overcast for far too long, that is the perfect time to turn to some quality comfort food. Whether it is a dish that your grandmother used to make on a cold winter’s day or that crowd pleasing pasta dish you excel at, comfort food has a way of brightening everything. So, when the forecast has been icy and another storm is on the horizon (Yay winter!) I turn to my mom’s homemade banana bread. This recipe is simple to make but packs a whole lot of yum. Nothing beats the smell of bananas coming out of the oven. It literally has my mouth watering just thinking about it! I’m a simple gal, so throwing some butter on a piece of fresh banana bread and walking out the door is the best start to a soon to be snowy day.

So when I decided to make some I realized that I was fresh out of ripened bananas. What’s a girl to do? Pick up the phone and call Mom! Not only does she have some ready to go but my dad would LOVE to see the back of his freezer =) As a thank you, I made two batches and left some for them to enjoy. My mom is awesome and the last time she baked banana bread for me was the morning I was leaving for a flight to California. The plan was to pick up a friend in San Diego and road trip it up to Seattle and Vancouver. I asked my mom if she would do me the biggest favor and make some of her awesome banana bread for me to take so we could have it for breakfast while we traveled. She got up early and made some for me fresh.

To keep the bread fresh, she wrapped the loaves in cling-wrap and then aluminum foil. As the savvy traveler I am, I realized that the bread had to go in my carry-on so as not to get squished. What I didn’t count on was how it would look on the scanner. So there I am, shoeless at 5 in the morning hoping to grab something to drink before I get on the plane and security comes over and asks to scan my bag again. Sure, I’ve got nothing to hide. It comes through and he asks me what’s in there. "Oops! Forgot my camera equipment was stuffed in there." “No, this is on top.” “Oh! That’s my banana bread! My mom just made it for me. It’s fantastic!” “Can we scan it?” Into a plastic tub it goes. At this point I really doubt I’m getting my bread back and this thought takes the wind out of my sails. If I can’t eat it, someone must so I told the guy he could keep it, but he would have to eat it. A woman comes over holding my bread and goes “Is this her?” Ok, now I might be in trouble. “Sorry ma’am, I told him to give you a hard time, but you’re good to go.” “Great! Can I have my banana bread back?” With a smile she hands it over, and I feel victorious! There will be banana bread for breakfast! It wasn’t until I called my mom to tell her the tale that she laughs and tells me they probably thought it had been C4. It was the right shape and wrapped in foil. I am a genius. Apparently a brunette can still have major blond moments!

So, without further ado, here’s the recipe for my mom’s security stopping banana bread!

Babycakes

YOU WILL NEED:


1/2 c. shortening

1 c. sugar
2 eggs
3/4 c. mushed banana (roughly 5 frozen bananas)
1 1/2 c. flour
3/4 tsp baking soda
1/2 tsp salt

PREPARATIONS: 

1. Preheat the oven to 350°.
2. Cream the shortening and sugar together until fluffy. 


3. Add eggs one at a time until fully mixed. 
4. Stir in mushed bananas. 


5. In a separate bowl, mix together flour, baking soda and salt. 
6. Add to banana mixture. If you want to add nuts, you can either mix them in now or sprinkle them on top.
7. Place into a greased 9x9x2 pan and bake for 30-35 minutes. If the bananas are still slightly frozen (see note below), then it will take the bread longer to cook. After 30 min, check it every 5 until it is not longer goopy and a toothpick comes out mostly clean. You want some residue on the toothpick because this means the bread is not overcooked and thus too dry. Moist banana bread is, in my humble opinion, amazing =)


You can use fresh bananas for this but I find it’s best to let your bananas get a bit rotten. When they start to turn brown, my mom throws them into a zip-lock bag in the freezer. When we are ready to use them, we place them in a bowl to thaw (you can microwave them for a minute so the peels are easier to get off or just wait until they fully thaw, the peel sloshes right off). These “rotten” bananas are full of sugar and juicy so they make the bread sweet and moist: The perfect combo!